

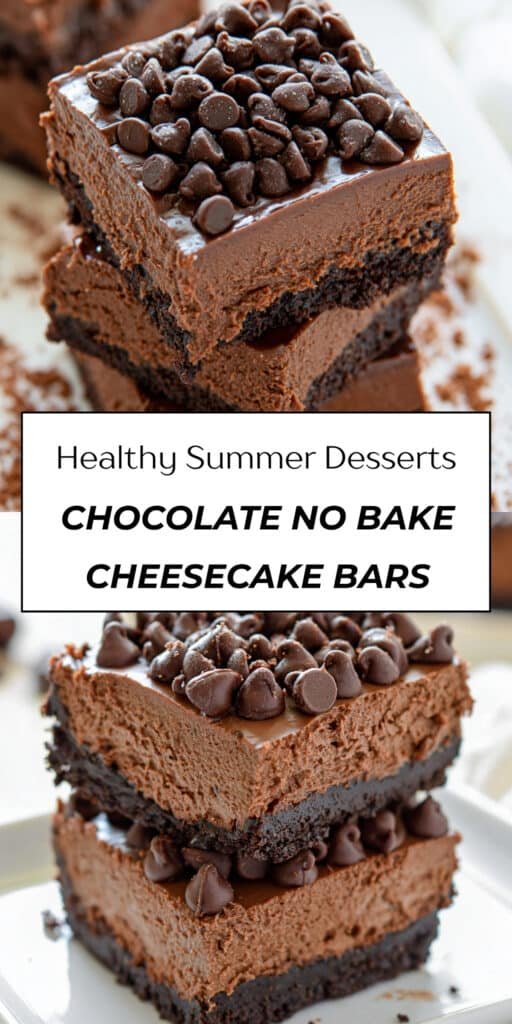
If there were ever a dessert made specifically for chocolate lovers, these Death-By-Chocolate No-Bake Cheesecake Bars would be it. Rich, silky, and unapologetically decadent, they layer a deep chocolate Oreo crust with a creamy chocolate cheesecake filling and a final shower of mini chocolate chips for a dessert that truly lives up to its name. Every bite is cool, smooth, intensely chocolatey, and packed with the kind of indulgent flavor that makes this the dessert people remember long after the plates are cleared.
These bars are especially perfect when you want a make-ahead dessert that looks impressive but doesn’t require turning on the oven. Whether you’re planning for a holiday gathering, a birthday dinner, a summer party, or simply need a reliable dessert to keep tucked in the fridge, this recipe checks every box. It’s quick to assemble, easy to chill in advance, and delivers that luxurious cheesecake texture with surprisingly little effort.
What makes this recipe so irresistible is the combination of textures and flavors. The crust is buttery, chocolatey, and slightly crisp, while the filling is luscious and mousse-like thanks to melted dark chocolate, cream cheese, and heavy cream. A sprinkle of mini chocolate chips on top adds just the right little crunch to finish it off. If you’ve been searching for the ultimate no-bake chocolate cheesecake bars recipe, this is the one to bookmark.
Why You’ll Love This Recipe
- No oven required. These bars are completely no-bake, which makes them perfect for warm days or easy entertaining.
- Deep, rich chocolate flavor. Chocolate appears in the crust, the filling, and the topping for a true chocoholic dessert.
- Perfect make-ahead treat. They need time to chill, so they’re ideal for preparing the day before a party or gathering.
- Creamy and decadent. The filling is silky, rich, and cheesecake-like without feeling fussy.
- Simple but impressive. With just a handful of ingredients and easy steps, the final result feels special enough for any celebration.
Ingredients
These Death-By-Chocolate No-Bake Cheesecake Bars rely on simple ingredients, but each one helps build the rich texture and intense chocolate flavor that make this dessert unforgettable.
For the Crust
- 18 Oreo cookies – Form the base of the crust and add classic chocolate cookie flavor with just the right amount of sweetness.
- ¼ cup unsalted butter, melted – Binds the cookie crumbs together and helps create a firm, sliceable crust.
- 1 tablespoon dark chocolate, melted – Adds an extra layer of rich chocolate flavor to the crust and helps reinforce the “death-by-chocolate” theme.
For the Chocolate Cheesecake Filling
- 4 ounces brick-style cream cheese, softened – Gives the filling its tangy cheesecake flavor and creamy structure.
- 8 ounces dark chocolate, chopped – The star ingredient in the filling, adding bold, rich chocolate flavor and a silky texture.
- ¾ cup heavy whipping cream – Helps create a luscious, smooth filling with a mousse-like finish.
- 1 tablespoon Baileys Irish Cream or Kahlua, optional – Adds a subtle grown-up depth of flavor that pairs beautifully with dark chocolate.
- ½ teaspoon salt, optional but recommended – Balances the sweetness and makes the chocolate taste deeper and more complex.
For the Topping
- ½ cup mini semi-sweet chocolate chips – Sprinkle over the top for extra chocolate flavor and a little texture in every bite.
How to Make Death-By-Chocolate No-Bake Cheesecake Bars
This easy no-bake chocolate cheesecake bars recipe comes together in a few simple stages: making the crust, whipping the filling, layering everything together, and letting the bars chill until perfectly firm.
1. Prepare the Pan
Line a 9×9-inch pan with aluminum foil, leaving enough overhang on the sides to help lift the bars out later. Lightly spray the foil with cooking spray and set the pan aside.
This step makes cleanup easier and helps the finished cheesecake bars come out neatly for slicing.
2. Make the Oreo Crust
Add the whole Oreo cookies to a food processor and process until you have fine crumbs.
In a small microwave-safe bowl, combine the melted butter and 1 tablespoon dark chocolate. Heat just until melted and smooth, then stir well. Pour this mixture into the food processor with the Oreo crumbs and pulse until the crumbs are evenly coated.
Transfer the crumb mixture to the prepared pan and press it firmly into an even layer. Use the bottom of a measuring cup or glass to really pack it down so the crust holds together well once chilled.
Set the crust aside while you make the filling.
3. Beat the Cream Cheese
In a large mixing bowl, beat the softened cream cheese with a handheld mixer on high speed until smooth and fluffy.
Starting with well-softened cream cheese helps prevent lumps and ensures the filling turns out silky rather than grainy.
4. Melt the Chocolate and Cream
In a separate large microwave-safe bowl, combine the chopped dark chocolate and heavy whipping cream.
Microwave in 30-second intervals, stirring between each one, until the chocolate is fully melted and the mixture is smooth and glossy. This usually takes about 90 seconds total, but the exact time can vary depending on your microwave. Be careful not to overheat it—you want the mixture silky, not scorched.
5. Make the Chocolate Cheesecake Filling
Pour the melted chocolate and cream mixture into the bowl with the whipped cream cheese. Beat on high speed until the filling is smooth, thick, and fully combined.
If using, add the Baileys or Kahlua and the salt, then mix again to incorporate. The salt is especially helpful here because it cuts through the richness and enhances the chocolate flavor without making the dessert taste salty.
6. Assemble the Bars
Spread the chocolate cheesecake filling evenly over the prepared Oreo crust, smoothing the top with a spatula.
Sprinkle the mini chocolate chips evenly over the top so every slice gets a little extra chocolate.
7. Chill Until Firm
Transfer the pan to the refrigerator and chill for at least 3 hours, or until the bars are firm enough to slice cleanly. Overnight is even better if you’re making them ahead.
Once the bars have chilled and set, cover the pan with foil if you’re storing them longer in the refrigerator.
8. Slice and Serve
When fully chilled, use the foil overhang to lift the bars out of the pan. Slice into squares and serve cold.
For the cleanest cuts, use a sharp knife and wipe it clean between slices.
Tips for Success
- Use softened cream cheese. This is one of the most important steps for a smooth filling without lumps.
- Press the crust firmly into the pan. A tightly packed crust is easier to slice and won’t crumble as much.
- Melt the chocolate gently. Microwave in short bursts and stir often to avoid scorching.
- Don’t skip the chill time. These bars need enough time in the refrigerator to fully set before slicing.
- Add the salt. Even if optional, it really helps balance the richness and deepen the chocolate flavor.
- Use a hot, clean knife for neat slices. Wiping the knife between cuts makes a big difference with creamy desserts like this.
Equipment Needed
You only need a few basic tools to make these Death-By-Chocolate No-Bake Cheesecake Bars.
- 9×9-inch baking pan – The ideal size for thick, rich cheesecake bars.
- Aluminum foil – Makes it easier to lift the bars out of the pan.
- Cooking spray – Helps prevent sticking.
- Food processor – Quickly turns Oreos into fine crumbs for the crust.
- Handheld electric mixer – Useful for beating the cream cheese until fluffy and smooth.
- Microwave-safe bowls – Needed for melting the chocolate and butter mixtures.
- Spatula – For spreading the filling evenly across the crust.
Recipe Variations
This no-bake chocolate cheesecake bars recipe is already incredibly rich, but there are a few fun ways to change it up.
1. Use Milk Chocolate Instead of Dark Chocolate
If you prefer a sweeter, less intense chocolate flavor, swap the dark chocolate in the filling for milk chocolate.
2. Add Espresso Powder
A small pinch of espresso powder in the filling can intensify the chocolate flavor without making the bars taste like coffee.
3. Try a Mocha Version
Use Kahlua in the filling and sprinkle the top with chocolate-covered espresso beans or a dusting of cocoa powder for a mocha-inspired twist.
4. Add Crushed Candy on Top
For extra texture, top the bars with crushed chocolate cookies, chopped chocolate bars, or toffee bits in addition to the mini chocolate chips.
5. Make Them Extra Salty-Sweet
Finish the bars with a light sprinkle of flaky sea salt before chilling for an even bolder sweet-salty contrast.
Serving Suggestions
These Death-By-Chocolate No-Bake Cheesecake Bars are rich enough to be a show-stopping dessert all on their own, but here are a few ways to make them even more special.
- Serve well chilled for the best creamy texture and clean slices.
- Top with whipped cream if you want a little contrast to the rich chocolate filling.
- Garnish with chocolate curls or shaved chocolate for an elegant presentation.
- Pair with fresh raspberries or strawberries to add a bright, fruity balance.
- Serve with coffee or espresso for a classic after-dinner pairing.
- Cut into smaller squares for parties since they’re very rich and a little goes a long way.
FAQs
Do I need to remove the Oreo filling before making the crust?
No. Use the Oreos whole, filling and all. The filling helps add sweetness and richness to the crust.
Can I make these cheesecake bars ahead of time?
Yes, and they’re actually ideal for making ahead. You can prepare them a day or two in advance and keep them refrigerated until serving.
How long do they need to chill?
At least 3 hours, but overnight is even better if you want the bars fully set and easy to slice.
Can I leave out the Baileys or Kahlua?
Absolutely. The bars are still delicious without it. The liqueur simply adds a little extra depth and warmth to the chocolate flavor.
How should I store leftovers?
Store the bars covered in the refrigerator. They keep well for up to 10 days, making them a great make-ahead dessert.
Can I freeze them?
Yes. Slice the bars, place them in an airtight container, and freeze for longer storage. Thaw in the refrigerator before serving for the best texture.
Final Thoughts
These Death-By-Chocolate No-Bake Cheesecake Bars are everything a chocolate dessert should be: rich, creamy, deeply chocolatey, and completely indulgent. With their buttery Oreo crust, silky chocolate cheesecake filling, and extra layer of chocolate chips on top, they deliver that over-the-top dessert experience without requiring any baking at all.
They’re also one of those rare desserts that feel equally perfect for casual cravings and special occasions. Because they’re easy to prep ahead, beautifully sliceable, and guaranteed to impress fellow chocolate lovers, they’re a fantastic recipe to keep in your dessert rotation year-round.
If you make these easy no-bake chocolate cheesecake bars, don’t be surprised if they disappear quickly. Serve them cold, slice them small if you can resist, and enjoy every rich, creamy, chocolate-packed bite.
Print
Death-By-Chocolate No-Bake Cheesecake Bars
- Total Time: 3 hours 10 minutes
- Yield: 16 bars
- Diet: Vegetarian
Description
Death-By-Chocolate No Bake Cheesecake Bars are a rich, creamy, decadent dessert loaded with layers of chocolate flavor. This easy no-bake make-ahead treat is perfect for serious chocolate lovers.
Ingredients
- 18 Oreo cookies
- 1/4 cup unsalted butter, melted
- 1 tablespoon dark chocolate, melted
- 4 ounces brick-style cream cheese, softened
- 8 ounces dark chocolate, chopped
- 3/4 cup heavy whipping cream
- 1 tablespoon Baileys Irish Cream or Kahlua, optional
- 1/2 teaspoon salt, optional but recommended
- 1/2 cup mini semi-sweet chocolate chips
Instructions
- Line a 9×9-inch pan with aluminum foil and spray with cooking spray. Set aside.
- Add the Oreo cookies to a food processor and process until fine crumbs form. Set aside.
- In a small microwave-safe bowl, combine the melted butter and 1 tablespoon dark chocolate. Heat until fully melted and smooth.
- Pour the melted butter and chocolate mixture into the food processor with the Oreo crumbs and process until combined.
- Press the crumb mixture firmly into the prepared pan to form an even crust layer. Set aside.
- In a large mixing bowl, beat the softened cream cheese with a handheld mixer until fluffy. Set aside.
- In a separate large microwave-safe bowl, combine the chopped dark chocolate and heavy whipping cream. Heat in 30-second increments, stirring each time, until the chocolate is melted and the mixture is smooth.
- Add the melted chocolate mixture to the bowl with the cream cheese and beat until fully smooth and combined.
- Mix in the Baileys or Kahlua and salt, if using.
- Spread the chocolate cheesecake mixture evenly over the crust.
- Sprinkle the mini chocolate chips evenly over the top.
- Refrigerate for at least 3 hours, or until fully chilled and set, before slicing and serving.
Notes
- Do not cover the bars immediately after refrigerating, as condensation can form while the filling is still warm. Once fully chilled, cover with foil.
- These cheesecake bars can be made ahead and stored in the refrigerator for up to 10 days.
- Prep Time: 10 minutes
- Cook Time: 0 minutes
- Category: Dessert
- Method: No Bake
- Cuisine: American