

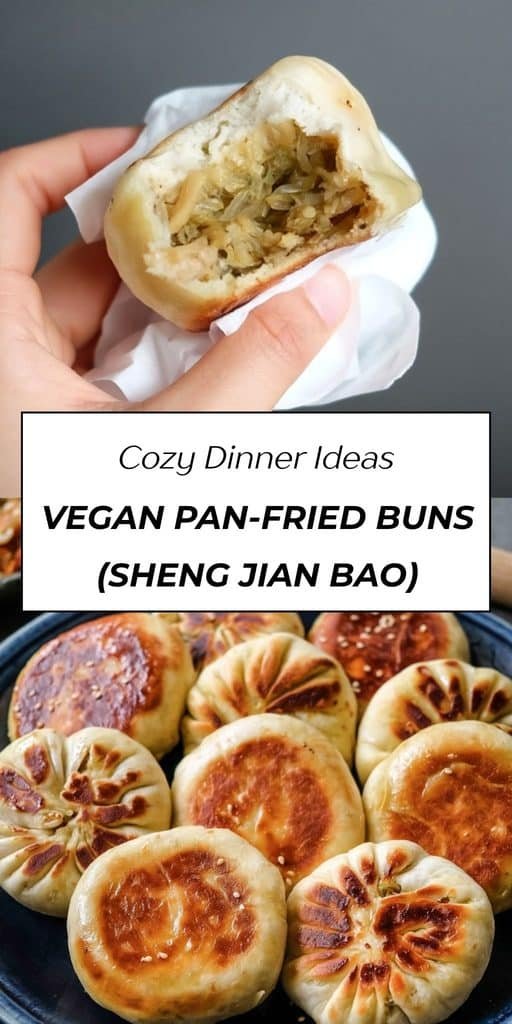
These Vegan Pan-Fried Buns, also known as Sheng Jian Bao, are crispy on the outside, chewy and tender inside, and filled with a savory mixture of cabbage, vermicelli noodles, carrots, and scallions. The buns are first pan-fried until golden and crisp, then steamed right in the pan to create that wonderful combination of textures.
Inspired by the delicious buns found at food stalls and night markets in Taipei, this homemade version is a fun project when you’re craving something special. The dough is soft and easy to work with once you get the hang of shaping the wrappers, and the vegetable filling is packed with savory sesame and soy sauce flavor.
The best part? These vegan buns freeze beautifully, so you can make a batch ahead of time and have homemade Sheng Jian Bao ready whenever the craving hits.
Why You’ll Love This Recipe
- Crispy and chewy: Pan-frying creates a golden crust while steaming keeps the inside soft and chewy.
- Completely vegan: The dough and filling use simple plant-based ingredients.
- Flavorful vegetable filling: Cabbage, carrots, vermicelli, scallions, soy sauce, and sesame oil make every bite satisfying.
- Freezer-friendly: Cooked buns can be frozen and reheated whenever you want them.
- A fun homemade project: Making and folding the buns is easier with practice and makes this recipe especially rewarding.
Ingredients
For the Dough
- All-purpose flour: Forms the soft, chewy dough used for the bun wrappers.
- Instant dry yeast: Helps the dough rise and gives the wrappers their tender texture.
- Sugar: Adds a subtle sweetness and supports the yeast.
- Salt: Balances the flavor of the dough.
- Roasted sesame seeds: Add a subtle nutty flavor.
- Warm soy milk or other non-dairy milk: Provides the moisture needed to bring the dough together.
- Toasted sesame oil or neutral oil: Adds richness and flavor to the dough.
For the Filling
- Neutral oil: Used to sauté the vegetables.
- Shredded cabbage: Provides the main bulk and a tender, slightly sweet vegetable texture.
- Vermicelli noodles: Add a pleasantly chewy texture and help make the filling substantial.
- Carrot: Adds natural sweetness, color, and texture.
- Scallions or chives: Bring a fresh, savory onion flavor.
- Soy sauce: Adds salty, umami-rich flavor.
- Salt: Enhances the filling.
- Roasted sesame seeds: Add nutty flavor and texture.
- Toasted sesame oil: Gives the filling a rich sesame aroma.
How to Make Vegan Pan-Fried Buns
Prepare the Dough
In a large bowl, combine the flour, instant yeast, sugar, salt, and roasted sesame seeds.
Create a well in the center, then pour in the warm soy milk and oil while mixing.
Continue mixing until a dough forms.
Shape the dough into a ball and place it in a bowl. Cover with a damp towel and allow it to rest and rise for approximately 2 hours.
A little patience here pays off—the rested dough will be much easier to shape into wrappers.
Cook the Vegetable Filling
Place the dry vermicelli noodles in boiling water and soak for 7–8 minutes, or until cooked.
Drain thoroughly, then roughly chop the noodles into pieces about 1/2 inch long.
Heat a pan over medium-high heat and add the neutral oil.
Add the scallions or chives, carrots, and cabbage. Cook for approximately 4–5 minutes, until the carrots are tender.
Add the chopped vermicelli noodles.
Pour in the soy sauce, salt, and toasted sesame oil. Stir everything together with a wooden spoon or spatula.
Cook for another 2–3 minutes over medium heat, then taste and adjust the seasoning if needed.
Transfer the filling to a strainer to remove excess liquid. Set it aside to cool while you prepare the wrappers.
Prepare the Wrappers
Take the rested dough out of the bowl and stretch it into a large ring. An easy way to begin is by punching a hole through the center of the dough ball.
Divide the dough into 12 or 16 pieces.
If making 12 buns, each piece will be approximately 50g. If making 16 buns, each piece will be approximately 38g.
Shape each piece into a ball.
To make a wrapper, gently press down on a dough ball and lightly flatten it on your work surface.
Dust the dough and rolling pin lightly with flour. Hold both ends of the rolling pin and roll the dough forward and backward. Rotate the dough 90 degrees and repeat.
Continue rolling until you have a wrapper approximately:
- 3–4 inches in diameter for 38g pieces
- 4–5 inches in diameter for 50g pieces
Don’t worry if your wrappers aren’t perfectly round. They are flexible and can be stretched and adjusted while you’re filling and folding the buns.
Place the finished wrappers on a tray with space between them. If stacking them, lightly dust each layer with flour to prevent sticking and keep each stack to no more than 4–5 wrappers.
Cover them with a dry towel so they don’t dry out.
If the wrappers will sit for more than 30 minutes, keep them separated on a tray instead of stacking them.
Fill and Shape the Buns
Place one wrapper on your work surface and add approximately 2–3 tablespoons of filling to the center.
Hold the wrapper with one hand and begin creasing the edges while using your other hand to pinch the folds together.
Continue working around the entire edge until the filling is enclosed.
Pinch and twist the top to seal the bun.
Place the finished bun on a flat surface and gently press down on the top.
Transfer it back to the tray and cover with a towel to prevent it from drying out.
Repeat with the remaining wrappers and filling.
Pan-Fry the Buns
Heat a lidded pan over medium heat.
Add approximately 1 tablespoon of oil for every 4 buns.
When the oil is hot, carefully place the buns in the pan, creased-side first.
Lightly press them down and cook over medium heat for 4–5 minutes, until the bottom develops a beautiful golden-brown crust.
Flip the buns and cook until the other side is golden as well.
The number of buns you can cook in each batch will depend on the size of your pan. Avoid overcrowding them.
Steam the Buns
Once the buns are browned, carefully prepare to add the water.
Using the pan lid as protection, carefully pour approximately 4 tablespoons of water into the pan—about 1 tablespoon per bun.
Immediately cover the pan with the lid to prevent hot water from splashing.
Allow the buns to steam for approximately 5–6 minutes, or until the water has evaporated.
Remove the cooked buns from the pan and repeat the process with the remaining buns.
Serve hot.
Tips for Success
- Don’t rush the dough resting time. Properly rested dough is easier to roll and shape.
- Drain the vegetable filling well. Excess liquid can make the wrappers difficult to seal.
- Let the filling cool before wrapping. Warm filling can make the dough harder to handle.
- Don’t worry about perfect circles. Homemade wrappers don’t need to look perfect to make delicious buns.
- Keep unused wrappers covered. Exposure to air can quickly dry them out.
- Avoid stacking too many wrappers. Keep stacks to 4–5 wrappers and dust between layers with flour.
- Don’t overcrowd the pan. Cook the buns in batches according to the size of your pan.
- Be careful when adding water. The pan and oil will be very hot, so use the lid as protection and cover immediately.
Recipe Variations
Add More Vegetables
You can experiment with the filling by adding finely chopped mushrooms, extra scallions, or other vegetables you enjoy.
Make Them Spicier
Add chili sauce or chili oil to the filling, or serve the finished buns with a spicy dipping sauce.
Try Different Non-Dairy Milk
Soy milk works well for the dough, but another unsweetened non-dairy milk can also be used.
Change the Dipping Sauce
For a simple dipping sauce, combine soy sauce with a little sugar, chili sauce, and roasted sesame seeds.
Serving Suggestions
These pan-fried buns are delicious served piping hot with a simple dipping sauce.
For an easy sauce, mix together soy sauce, sugar, chili sauce, and sesame seeds.
Serve them as an appetizer, snack, side dish, or part of a larger Asian-inspired meal. They’re especially enjoyable straight from the pan while the bottoms are still crisp and the centers are warm and chewy.
How to Store Cooked Buns
Place cooked buns in an airtight container and refrigerate for up to 5 days.
To reheat, pan-fry them again with a splash of water, warm them in a toaster oven on low heat, or microwave them in a bowl with a small splash of water.
How to Freeze Vegan Pan-Fried Buns
These buns freeze very well.
Place the cooked buns on a tray, leaving space between each one so they don’t stick together.
Freeze for approximately 5–6 hours, or until completely firm.
Once frozen, transfer the buns to a plastic or silicone freezer bag. This allows you to remove and reheat individual buns whenever you want.
There’s no need to thaw them first. Reheat them in a pan, toaster oven, or steamer until hot.
FAQs
What does Sheng Jian Bao mean?
Sheng Jian Bao refers to a style of Chinese pan-fried bun. The buns are cooked in a pan so they develop a crisp, golden exterior while the dough remains soft and chewy.
Can I freeze these vegan buns?
Yes. Cooked buns can be frozen individually on a tray before being transferred to a freezer bag. They can be reheated directly from frozen without thawing.
Why does my dough need to rest?
The resting period gives the yeast time to work and allows the dough to rise, resulting in a softer, more manageable wrapper.
How do I prevent the wrappers from sticking together?
Lightly dust each wrapper with flour before stacking, and don’t stack more than 4–5 wrappers. If they’ll be sitting for more than 30 minutes, keep them separated instead.
Why should I drain the filling?
Cabbage and other vegetables release liquid while cooking. Draining the filling prevents excess moisture from making the wrappers difficult to seal or causing them to become soggy.
What can I serve with Sheng Jian Bao?
A simple dipping sauce made with soy sauce, sugar, chili sauce, and sesame seeds is delicious. You can also serve the buns alongside other Asian-inspired dishes as an appetizer or side.
Nutrition Information
Per bun:
- Calories: 135 kcal
- Carbohydrates: 21g
- Protein: 3g
- Fat: 4g
- Saturated Fat: 1g
- Polyunsaturated Fat: 2g
- Monounsaturated Fat: 2g
- Trans Fat: 1g
- Sodium: 432mg
- Potassium: 77mg
- Fiber: 1g
- Sugar: 2g
- Vitamin A: 26 IU
- Vitamin C: 10mg
- Calcium: 24mg
- Iron: 1mg
Final Thoughts
These Vegan Pan-Fried Buns are a delicious homemade take on the crispy, chewy buns found at Taiwanese food stalls and night markets. The combination of golden pan-fried dough and savory cabbage, vermicelli, carrot, and scallion filling makes them hard to resist.
They do take a little time and practice, especially when you’re learning to roll and fold the wrappers, but once you get comfortable with the process, making a batch becomes incredibly rewarding.
And since they freeze so well, there’s every reason to make extra. Keep a stash in the freezer, and you’ll always have a delicious homemade snack ready for the next bun craving.
Print
Vegan Pan-Fried Buns (Sheng Jian Bao, 生煎包)
- Total Time: 2 hours 30 minutes
- Yield: 16 buns
- Diet: Vegan
Description
These vegan pan-fried buns, also known as Sheng Jian Bao, are filled with cabbage, vermicelli noodles, carrots, and scallions, then wrapped in homemade dough and pan-fried until golden and crisp before being steamed until chewy and tender inside.
Ingredients
- Dough
- Dry Ingredients: 3 cups all-purpose flour (375 g), 2 tsp instant dry yeast, 2 tbsp sugar, 1/2 tsp salt, 1 tbsp roasted sesame seeds
- Wet Ingredients: 1 cup warm soy milk or other non-dairy milk, 1 tbsp toasted sesame oil or neutral oil
- Filling: 1 tbsp neutral oil for cooking, 6 cups raw shredded cabbage from 1/2 large head of cabbage, 3.5 oz uncooked vermicelli noodles (100 g total), 1 cup finely shredded or grated carrot (150 g), 1/2 cup chopped scallions or chives (25 g), 1 tbsp soy sauce, 2 tsp salt or to taste, 1 tbsp roasted sesame seeds, 2 tbsp toasted sesame oil
Instructions
- Prepare the Dough: In a large bowl, mix together all the dry ingredients. Create a well in the center, then pour in the warm milk and oil while mixing. Continue mixing until a dough forms. Shape the dough into a ball, place it in a bowl, cover with a damp towel, and let it rest for at least 2 hours to rise.
- Cook the Filling: Soak the dry vermicelli noodles in boiling hot water for 7-8 minutes, or until cooked. Drain and roughly chop into small 1/2-inch pieces.
- Heat a pan and add 1 tbsp neutral oil. When hot, add the chives, carrots, and cabbage. Cook over medium-high heat for 4-5 minutes, until the carrots are tender. Add the noodles, soy sauce, salt, and toasted sesame oil. Mix well and cook for another 2-3 minutes. Adjust seasoning to taste.
- Transfer the filling to a strainer to drain excess liquid from the vegetables, then set aside to cool.
- Prepare the Wrappers: Remove the dough from the bowl and stretch it into a large ring by first making a hole in the center. Slice the dough into 12 or 16 pieces. Shape each piece into a ball.
- To make a wrapper, lightly flatten each dough ball. Sprinkle with flour and roll it out, rotating the dough 90 degrees as you work, until you have a wrapper about 3-4 inches in diameter for 38 g pieces or 4-5 inches for 50 g pieces.
- Place the wrappers on a tray, spaced apart, or lightly flour each layer if stacking. Do not stack more than 4-5 wrappers. Cover with a dry towel to prevent them from drying out.
- Make the Buns: Place 2-3 tbsp of filling in the center of each wrapper. Crease the edges of the wrapper while pinching the creases together until you have gone around the entire edge. Pinch and twist to seal the bun.
- Place each bun on a flat surface and lightly press down the top. Return the buns to the tray and cover with a towel. Repeat with the remaining wrappers and filling.
- Cook the Buns: Heat a lidded pan and add 1 tbsp oil for every 4 buns. When hot, add the buns crease-side first and lightly press them down. Cook over medium heat for 4-5 minutes, until golden brown. Flip and cook until golden brown on the other side.
- Using the pan lid as protection, carefully pour 4 tbsp water into the pan, approximately 1 tbsp per bun, then immediately cover the pan to prevent splashing.
- Steam the buns for about 5-6 minutes, or until the water has evaporated. Remove the buns and repeat with the remaining batches.
- Serve hot with your favorite dipping sauce. A simple mixture of soy sauce, sugar, chili sauce, and sesame seeds works well.
Notes
- Store cooked buns in an airtight container in the refrigerator for up to 5 days. Reheat by pan-frying with a splash of water, oven-toasting over low heat, or microwaving with a splash of water.
- Cooked buns can also be frozen. Freeze them separately on a tray for 5-6 hours or until hard, then transfer to a freezer-safe bag. Reheat directly from frozen without thawing.
- If wrappers will sit for more than 30 minutes, space them separately on a tray instead of stacking them to prevent sticking and drying.
- Prep Time: 1 hour
- Cook Time: 30 minutes
- Category: Appetizer, Side Dish, Snack
- Method: Stove Top, Steam
- Cuisine: Asian, Chinese, Taiwanese